


Table of contents
Notes
This post is also available on my main page at jvp.design/blog/building-a-blog-with-nuxt-c..
For those who want to follow along in code, you can get it from github.com/jvp-design/nuxt-blog-example
A video accompanying this post will be released on Thursday, 16-Jun. The link will be posted here when it's live.
Intro
In the last blog post I described how to set up a blog using SvelteKit with MDsveX and Tailwind. It worked well enough that it warranted being featured in Hashnode's feed as well a share on LinkedIn but, if I'm being honest, it felt a little hacky. Sure, it worked, but there was too much "custom" functionality I needed to add to get it working. Also, I tweeted a couple of weeks ago about how excited I was to try playing with Nuxt Content v2, but it wasn't ready at the time that I was ready to write the last blog post and record the last video.
Well well well, my handful of friends who may actually look at this, I've played around with Nuxt Content v2 to write this post. Also, I want to give a quick shoutout to Behon Baker for the video he released a couple of weeks ago about this. This may feel similar to what he did, but I'm trying to create as much content as I can of my own so here we go.
Set up the project
Per the documentation, we can set up a new Content v2 project by running
npx nuxi init nuxt-blog-example -t content
cd nuxt-blog-example
npm i
Running this sets up a very minimal scaffold for a project
 and when I run
 npm run dev and navigate to localhost:3000 I'm met with the following window
 For what it's worth, when you go to localhost:3000 you should be shown what is on the index.md page but for some reason that didn't seem to work for me.
No matter, let's continue.
For what it's worth, when you go to localhost:3000 you should be shown what is on the index.md page but for some reason that didn't seem to work for me.
No matter, let's continue.
Install Tailwind
This is also a fairly simple process, laid out succinctly in the documentation for the Nuxt/Tailwind module. To get started, for those who don't want to navigate elsewhere, you simply install the module and initialize Tailwind
npm i -D @nuxtjs/tailwindcss @tailwindcss/typography
npx tailwindcss init
then you just need to add the module to the modules section of your nuxt.config.ts file.
// nuxt.config.ts
import { defineNuxtConfig } from 'nuxt'

export default defineNuxtConfig({
  modules: ['@nuxt/content', '@nuxtjs/tailwindcss']
})
Then, we create a new file, called tailwind.css under a newly created assets/css folder at the root of our project.
It is in this file where you'll add your tailwind directives
/* assets/css/tailwind.css */

@tailwind base;
@tailwind components;
@tailwind utilities;
If you want to name the file something else that's fine you'll just need to configure the module to point to the location where you've stored this file. You can read all about that in the documentation for the module.
In order to save time, I'm going to just re-use the tailwind.config.js file from the previous post, copy the content from the base app.css file from that post, and copy over the fonts.
Instead of saving the fonts in /static/fonts/..., though, they'll instead be saved in /assets/fonts/... and we'll need to update the base css file to account for this.
tailwind.config.js file
For those who don't want to go elsewhere, this is the content that will go in the tailwind.config.js file
const defaultTheme = require('tailwindcss/defaultTheme')

/** @type {import('tailwindcss').Config} */
module.exports = {
    content: ['./src/**/*.{html,js,vue,ts}'],
    theme: {
        extend: {
            fontFamily: {
                sans: ['uncut-sans', ...defaultTheme.fontFamily.sans],
                serif: ['sprat', ...defaultTheme.fontFamily.serif]
            }
        }
    },
    plugins: [require('@tailwindcss/typography')]
};
Note that I have changed the extensions in the content attribute of module.exports to include a .vue extension instead of a .svelte one.
assets/css/tailwind.css file
As previously mentioned, we're going to copy over the same content from the last blog post's /src/styles/app.css into /assets/css/tailwind.css file, while also changing the location of where the font files are stored
/* /assets/css/tailwind.css */
@tailwind base;
@tailwind components;
@tailwind utilities;

@layer base {
    h1,
    h2,
    h3,
    h4,
    h5,
    h6 {
        @apply font-serif;
    }
    @font-face {
        font-family: 'sprat';
        src: local('Sprat'), local('sprat'), url('/assets/fonts/sprat/Sprat-Regular.otf');
        font-weight: normal;
        font-display: swap;
    }
    @font-face {
        font-family: 'sprat';
        src: local('Sprat'), local('sprat'), url('/assets/fonts/sprat/Sprat-RegularMedium.otf');
        font-weight: 500;
        font-display: swap;
    }
    @font-face {
        font-family: 'sprat';
        src: local('Sprat'), local('sprat'), url('/assets/fonts/sprat/Sprat-RegularBold.otf');
        font-weight: 600;
        font-display: swap;
    }

    @font-face {
        font-family: 'uncut-sans';
        src: local('Uncut-Sans'), local('Uncut Sans'), local('uncut-sans'), local('uncut sans'),
        url('/assets/fonts/uncut-sans/Uncut-Sans-Regular.otf');
        font-weight: normal;
        font-display: swap;
    }
    @font-face {
        font-family: 'uncut-sans';
        src: local('Uncut-Sans'), local('Uncut Sans'), local('uncut-sans'), local('uncut sans'),
        url('/assets/fonts/uncut-sans/Uncut-Sans-Medium.otf');
        font-weight: 500;
        font-display: swap;
    }
    @font-face {
        font-family: 'uncut-sans';
        src: local('Uncut-Sans'), local('Uncut Sans'), local('uncut-sans'), local('uncut sans'),
        url('/assets/fonts/uncut-sans/Uncut-Sans-Semibold.otf');
        font-weight: 600;
        font-display: swap;
    }
}
Site content
Now that the app is up and running it's time to start creating content.
The first thing we'll do is open /app.vue and set the height of the app to be the height of the screen, similarly to what we did in the previous post.
<template>
  <div class="h-screen">
    <NuxtPage />
  </div>
</template>
We can add styling to this in a similar manner to how I set up the __layout.svelte file in the last post.
Nuxt does support multiple layouts, but they recommend that if you're only going to use one layout then just do all of the necessary styling in the app.vue file.
Landing page
Next we need to set up the main landing page in a similar manner to the previous post.
Within the /pages directory (where currently the only file that exists is [...slug].vue) I'll now create an index.vue file and add the following content.
<template>
  <div class="grid h-screen place-content-center gap-3">
    <h1 class="text-5xl text-blue-500">Welcome to Nuxt Content</h1>
    <p class="text-xl text-red-600">
      Visit <a href="https://content.nuxtjs.org/">content.nuxtjs.org</a>
      to read the documentation
    </p>
    <nuxt-link
      href="/blog"
      class="mx-auto rounded-xl bg-amber-700 px-20 py-4 text-white"
    >
      Go to Blog
    </nuxt-link>
  </div>
</template>

Blog content
Now that we have a landing page up and running we have to create something that will be loaded when we click on the button on the landing page.
There are plenty of ways that we can host blog content, but the idea behind this site is this would be a "normal" site with a blog section so we're going to create a blog folder within the already existing content folder.
This is where we'll store all of our articles.
We get nesting by simply doing this; if you move the about.md file into this new folder and go to localhost/3000/blog/about then you should see the same thing you saw before (you may need to restart the server).
We also want a page, though, that will display all of our blog posts, which was the /src/routes/blog/index.svelte component in the last post.
To do this, we simply create a /pages/blog/index.vue file and, for now, add some dummy content
<template>
  <h1 class="grid h-full place-content-center text-5xl">Blog Home</h1>
</template>
The next thing we need to do is somehow fetch the articles in the /content/blog folder to display here.
Nuxt Content built-in helpers
Nuxt Content ships with some very helpful built-in components, about which you can read here content.nuxtjs.org/api/components/content-doc.
Before describing the two methods that we can use to fetch content, there is a built-in helper called <ContentNavigation> that will return a list of objects with "name" and "path" attributes strictly for navigation.
This does not provide access to things like the author, date, or description, so I'll leave exploration of that one to the reader.
ContentList
The very first helper that we can use for a "list" view is <ContentList>.
You can view the documentation for this helper at content.nuxtjs.org/api/components/content-l.. but I'll update the /pages/blog/index.vue component below.
<template>
  <main class="bg-white px-4 pt-16 pb-20 sm:px-6 lg:px-8 lg:pt-24 lg:pb-28">
    <div class="mx-auto max-w-lg lg:max-w-7xl">
      <div class="border-b border-b-gray-200 pb-6">
        <h2
            class="text-3xl font-semibold tracking-tight text-gray-900 sm:text-4xl"
        >
          Recent Posts
        </h2>
      </div>
      <div class="mt-12 grid gap-16 lg:grid-cols-3 lg:gap-x-5 lg:gap-y-12">
        <ContentList path="/blog" v-slot="{ list }">
          <div
              v-for="article in list"
              :key="article._path"
              class="flex flex-col justify-between rounded-lg border border-gray-200 p-4"
          >
            <nuxt-link :href="article._path">
              <p class="text-xl text-gray-900">{{ article.title }}</p>
              <p class="mt-3 text-gray-500">{{ article.description }}</p>
            </nuxt-link>
            <div class="mt-6">
              <a
                  :href="`?author=${article.author}`"
                  class="text-sm font-medium text-gray-900"
              >
                {{ article.author }}
              </a>
              <div class="text-sm text-gray-500">
                <time datetime="2020-03-16">{{ article.date }}</time>
              </div>
            </div>
          </div>
        </ContentList>
      </div>
    </div>
  </main>
</template>
You'll notice in the above component some very similar functionality. First, the styling is identical to what existed in the index.svelte file. Then, the main differences are in the way content is rendered in Vue vs in Svelte.
- Where we previously wrapped iterated content in an
{#each}{/each}block in Svelte we usev-forin Vue - The colon
:in Vue is a shorthand for thev-binddirective. In Vue,:href="article._path"would be equivalent tohref={article._path}in Svelte - In Vue we use a
{{ }}syntax to render a dynamic variable instead of the{}in Svelte
The other main difference is including the built-in <ContentList> component, which will fetch all content at the /content directory unless we tell it otherwise, which I did by including the path="/blog" attribute, telling it to fetch content from /content/blog for this rendered content list.
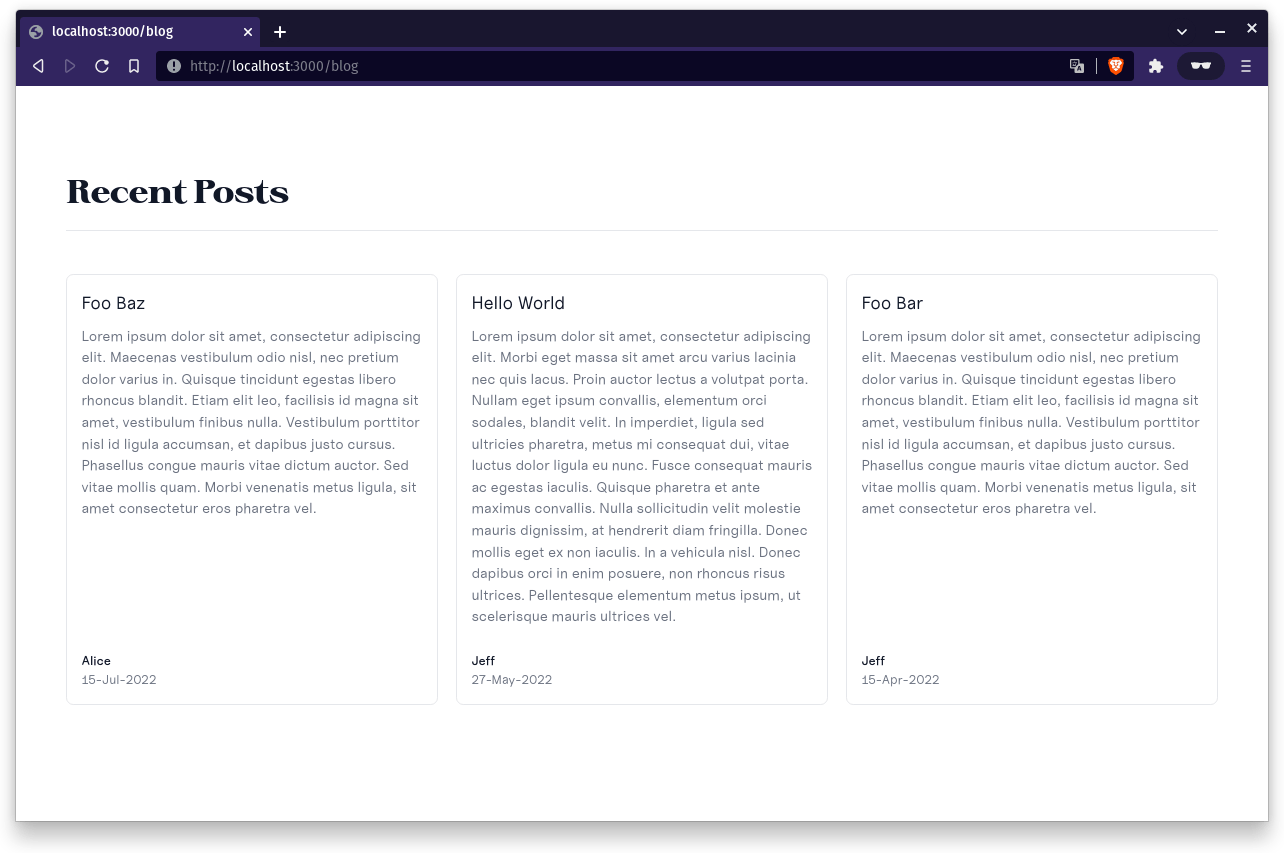
In looking at the resulting page at localhost:3000/blog we see
 There are a couple of things we need to "fix" to display things as we intended, but we automatically get the data without having to tell content where/how to parse the
 .md files.
All we've had to do is just point to the location and Nuxt Content knows where to find everything.
Small update to posts
In the SvelteKit example I had to manually choose what I wanted my excerpt to be.
In Nuxt Content all you need to do is add a little code snippet, <!--more--> after the code you want to be used as the description.
Everything before this tag will be included in the description (as well as in the main article) and that's all you need to do.
With that in mind, this is what the posts will now look like
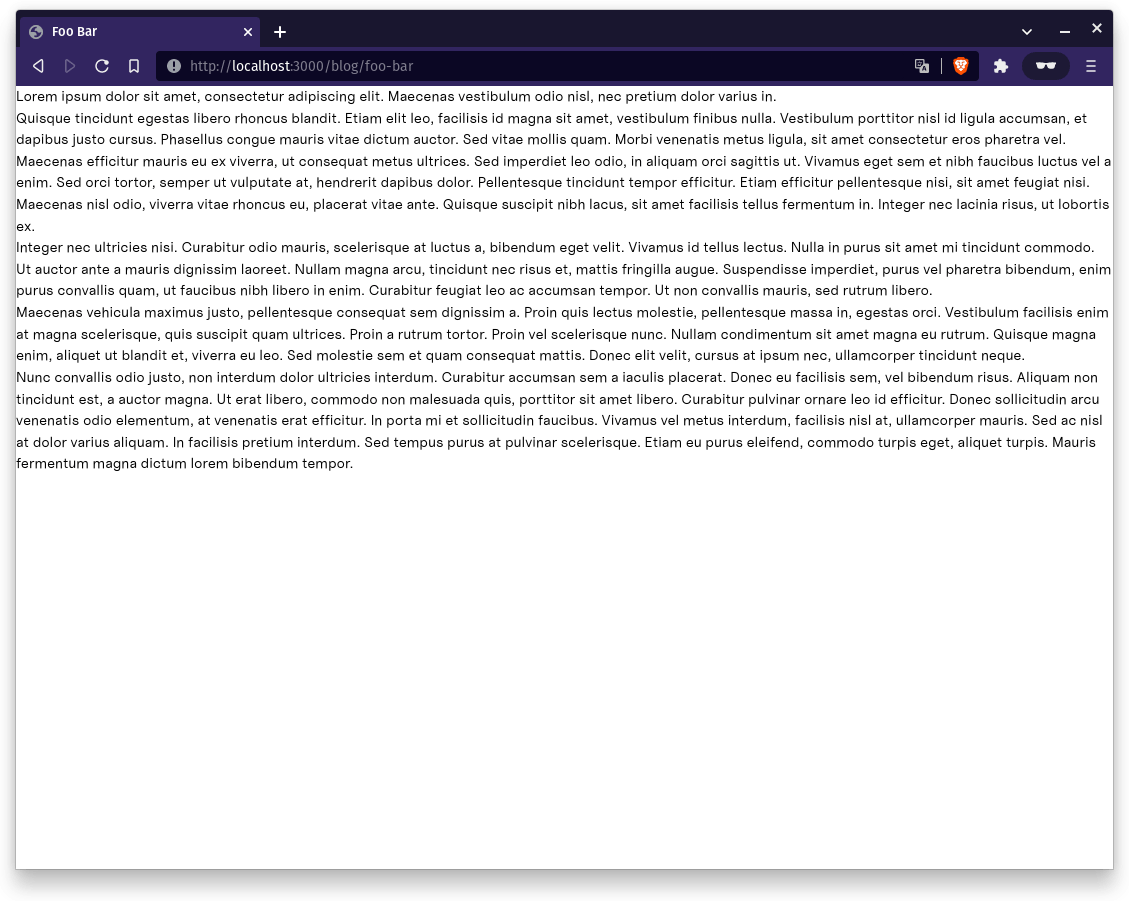
/content/blog/foo-bar.md
---
title: Foo Bar
author: Jeff
date: 2022-04-15
---

Lorem ipsum dolor sit amet, consectetur adipiscing elit. Maecenas vestibulum odio nisl, nec pretium dolor varius in.
<!--more-->
Quisque tincidunt egestas libero rhoncus blandit. Etiam elit leo, facilisis id magna sit amet, vestibulum finibus nulla. Vestibulum porttitor nisl id ligula accumsan, et dapibus justo cursus. Phasellus congue mauris vitae dictum auctor. Sed vitae mollis quam. Morbi venenatis metus ligula, sit amet consectetur eros pharetra vel.

Maecenas efficitur mauris eu ex viverra, ut consequat metus ultrices. Sed imperdiet leo odio, in aliquam orci sagittis ut. Vivamus eget sem et nibh faucibus luctus vel a enim. Sed orci tortor, semper ut vulputate at, hendrerit dapibus dolor. Pellentesque tincidunt tempor efficitur. Etiam efficitur pellentesque nisi, sit amet feugiat nisi. Maecenas nisl odio, viverra vitae rhoncus eu, placerat vitae ante. Quisque suscipit nibh lacus, sit amet facilisis tellus fermentum in. Integer nec lacinia risus, ut lobortis ex.

Integer nec ultricies nisi. Curabitur odio mauris, scelerisque at luctus a, bibendum eget velit. Vivamus id tellus lectus. Nulla in purus sit amet mi tincidunt commodo. Ut auctor ante a mauris dignissim laoreet. Nullam magna arcu, tincidunt nec risus et, mattis fringilla augue. Suspendisse imperdiet, purus vel pharetra bibendum, enim purus convallis quam, ut faucibus nibh libero in enim. Curabitur feugiat leo ac accumsan tempor. Ut non convallis mauris, sed rutrum libero.

Maecenas vehicula maximus justo, pellentesque consequat sem dignissim a. Proin quis lectus molestie, pellentesque massa in, egestas orci. Vestibulum facilisis enim at magna scelerisque, quis suscipit quam ultrices. Proin a rutrum tortor. Proin vel scelerisque nunc. Nullam condimentum sit amet magna eu rutrum. Quisque magna enim, aliquet ut blandit et, viverra eu leo. Sed molestie sem et quam consequat mattis. Donec elit velit, cursus at ipsum nec, ullamcorper tincidunt neque.

Nunc convallis odio justo, non interdum dolor ultricies interdum. Curabitur accumsan sem a iaculis placerat. Donec eu facilisis sem, vel bibendum risus. Aliquam non tincidunt est, a auctor magna. Ut erat libero, commodo non malesuada quis, porttitor sit amet libero. Curabitur pulvinar ornare leo id efficitur. Donec sollicitudin arcu venenatis odio elementum, at venenatis erat efficitur. In porta mi et sollicitudin faucibus. Vivamus vel metus interdum, facilisis nisl at, ullamcorper mauris. Sed ac nisl at dolor varius aliquam. In facilisis pretium interdum. Sed tempus purus at pulvinar scelerisque. Etiam eu purus eleifend, commodo turpis eget, aliquet turpis. Mauris fermentum magna dictum lorem bibendum tempor.
/content/blog/foo-baz.md
---
title: Foo Baz
author: Alice
date: 2022-07-15
---

Lorem ipsum dolor sit amet, consectetur adipiscing elit. Maecenas vestibulum odio nisl, nec pretium dolor varius in.
<!--more-->
Quisque tincidunt egestas libero rhoncus blandit. Etiam elit leo, facilisis id magna sit amet, vestibulum finibus nulla. Vestibulum porttitor nisl id ligula accumsan, et dapibus justo cursus. Phasellus congue mauris vitae dictum auctor. Sed vitae mollis quam. Morbi venenatis metus ligula, sit amet consectetur eros pharetra vel.

Maecenas efficitur mauris eu ex viverra, ut consequat metus ultrices. Sed imperdiet leo odio, in aliquam orci sagittis ut. Vivamus eget sem et nibh faucibus luctus vel a enim. Sed orci tortor, semper ut vulputate at, hendrerit dapibus dolor. Pellentesque tincidunt tempor efficitur. Etiam efficitur pellentesque nisi, sit amet feugiat nisi. Maecenas nisl odio, viverra vitae rhoncus eu, placerat vitae ante. Quisque suscipit nibh lacus, sit amet facilisis tellus fermentum in. Integer nec lacinia risus, ut lobortis ex.

Integer nec ultricies nisi. Curabitur odio mauris, scelerisque at luctus a, bibendum eget velit. Vivamus id tellus lectus. Nulla in purus sit amet mi tincidunt commodo. Ut auctor ante a mauris dignissim laoreet. Nullam magna arcu, tincidunt nec risus et, mattis fringilla augue. Suspendisse imperdiet, purus vel pharetra bibendum, enim purus convallis quam, ut faucibus nibh libero in enim. Curabitur feugiat leo ac accumsan tempor. Ut non convallis mauris, sed rutrum libero.

Maecenas vehicula maximus justo, pellentesque consequat sem dignissim a. Proin quis lectus molestie, pellentesque massa in, egestas orci. Vestibulum facilisis enim at magna scelerisque, quis suscipit quam ultrices. Proin a rutrum tortor. Proin vel scelerisque nunc. Nullam condimentum sit amet magna eu rutrum. Quisque magna enim, aliquet ut blandit et, viverra eu leo. Sed molestie sem et quam consequat mattis. Donec elit velit, cursus at ipsum nec, ullamcorper tincidunt neque.

Nunc convallis odio justo, non interdum dolor ultricies interdum. Curabitur accumsan sem a iaculis placerat. Donec eu facilisis sem, vel bibendum risus. Aliquam non tincidunt est, a auctor magna. Ut erat libero, commodo non malesuada quis, porttitor sit amet libero. Curabitur pulvinar ornare leo id efficitur. Donec sollicitudin arcu venenatis odio elementum, at venenatis erat efficitur. In porta mi et sollicitudin faucibus. Vivamus vel metus interdum, facilisis nisl at, ullamcorper mauris. Sed ac nisl at dolor varius aliquam. In facilisis pretium interdum. Sed tempus purus at pulvinar scelerisque. Etiam eu purus eleifend, commodo turpis eget, aliquet turpis. Mauris fermentum magna dictum lorem bibendum tempor.
/content/blog/hello-world.md
---
title: Hello World
author: Jeff
date: 2022-05-27
---

Lorem ipsum dolor sit amet, consectetur adipiscing elit. Morbi eget massa sit amet arcu varius lacinia nec quis lacus.
<!--more-->
Proin auctor lectus a volutpat porta. Nullam eget ipsum convallis, elementum orci sodales, blandit velit. In imperdiet, ligula sed ultricies pharetra, metus mi consequat dui, vitae luctus dolor ligula eu nunc. Fusce consequat mauris ac egestas iaculis. Quisque pharetra et ante maximus convallis. Nulla sollicitudin velit molestie mauris dignissim, at hendrerit diam fringilla. Donec mollis eget ex non iaculis. In a vehicula nisl. Donec dapibus orci in enim posuere, non rhoncus risus ultrices. Pellentesque elementum metus ipsum, ut scelerisque mauris ultrices vel.

Aliquam ullamcorper est vehicula, suscipit nulla pellentesque, convallis odio. Praesent eget elit eget magna fringilla pharetra tempor quis magna. Proin et est vestibulum neque rhoncus mattis non vel lacus. Proin vulputate risus vel dignissim vestibulum. Quisque id sollicitudin neque, sed sagittis urna. Vestibulum vehicula metus sed eros venenatis, sit amet facilisis nunc porta. Nam pharetra luctus sapien, ut venenatis nibh tincidunt mollis. Phasellus efficitur, felis vitae mattis cursus, sapien diam vulputate dui, sit amet pulvinar ante ipsum non urna.

Fusce est nulla, efficitur vitae turpis eget, pretium rutrum turpis. Fusce at lectus eros. Phasellus convallis condimentum dolor ac rutrum. Integer commodo augue et dui efficitur tincidunt. Nam scelerisque egestas quam, vitae ultrices turpis tincidunt rhoncus. Duis rutrum placerat erat. Ut ac tincidunt elit. In laoreet dictum mauris nec posuere. Curabitur tempus, dolor malesuada ultrices feugiat, ipsum eros faucibus tellus, eu ultricies nunc est sed dolor. Suspendisse nisi eros, vehicula vitae iaculis sit amet, aliquet sit amet leo. Sed euismod urna at eros posuere laoreet. Curabitur in sodales lorem. Nulla rutrum aliquam felis ac tempor.

Ut pretium vitae elit ac facilisis. Aliquam nisi tortor, feugiat at lacus sed, condimentum egestas urna. Vestibulum hendrerit augue non urna volutpat, et fermentum tortor pellentesque. Aenean eget pharetra leo. Vestibulum ut laoreet dui. Phasellus nec nunc imperdiet, mollis urna eget, interdum lacus. Nulla ac neque pulvinar ex vestibulum venenatis at sed mi. Aliquam faucibus risus eget dolor porttitor interdum. Phasellus rutrum augue ex, vel tempus velit sollicitudin vitae. Pellentesque libero sapien, ullamcorper nec elementum nec, pharetra sed nisl. Nullam egestas arcu et ex vulputate, pretium vestibulum odio convallis. Nam auctor risus nec fermentum ultricies.

Donec porttitor quis ipsum ut imperdiet. Fusce ac pretium felis, sit amet pharetra orci. Donec vitae quam ac tellus pellentesque fringilla. Curabitur placerat quam a leo imperdiet tincidunt. Nunc porta pulvinar orci sit amet varius. Suspendisse dapibus ipsum nec magna ultricies gravida. Maecenas varius justo ac sem rhoncus lobortis. Integer eget cursus diam. Vestibulum sollicitudin enim at metus scelerisque blandit. In sit amet pulvinar nunc. Sed sit amet rutrum ex, efficitur imperdiet nunc.
ContentRenderer
Now that we have the list of posts, we need to have something that will display the content when we click on the link.
This is equivalent to the /src/routes/blog/_layout.svelte component in the last project.
The place we'll start working with styling, etc, for this is in the pages/[...slug].vue component, which currently looks just like
<template>
  <main>
    <ContentDoc />
  </main>
</template>
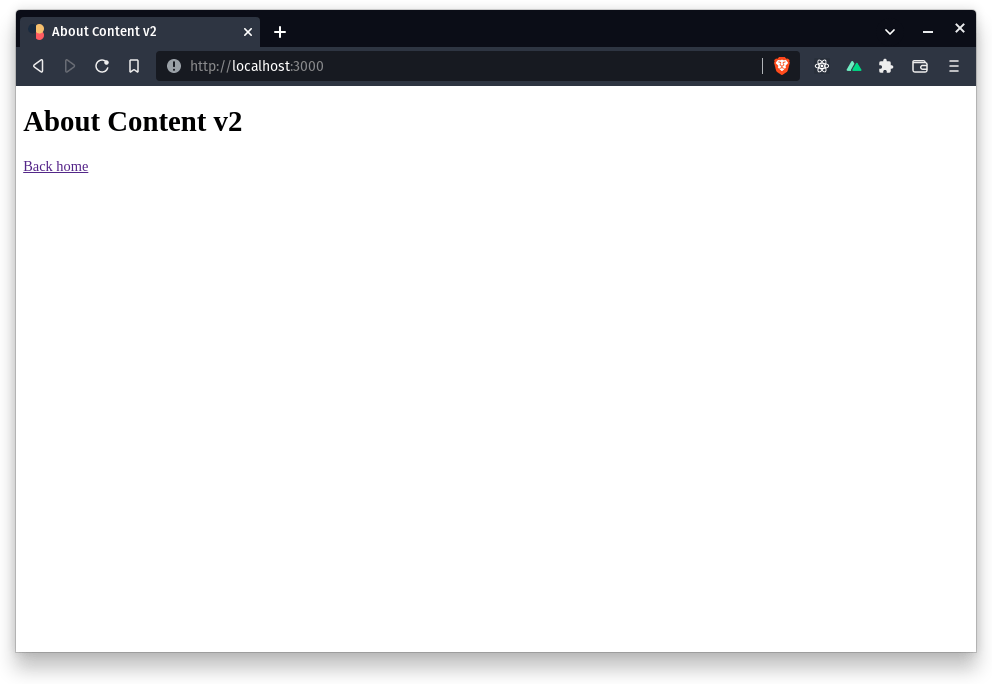
Just as an example, if we go to localhost:3000/blog/foo-bar we'll see
 Copying the styling over from github.com/jvp-design/sveltekit-tailwind-md.. we get
<template>
  <main
    class="relative mx-auto max-w-prose overflow-hidden bg-white py-16 px-4 sm:px-6 lg:px-8"
  >
    <nuxt-link
      class="block cursor-pointer"
      href="/blog"
    >
      <svg
        xmlns="http://www.w3.org/2000/svg"
        class="inline h-6 w-6"
        fill="none"
        viewBox="0 0 24 24"
        stroke="currentColor"
        stroke-width="2"
      >
        <path
          stroke-linecap="round"
          stroke-linejoin="round"
          d="M11 17l-5-5m0 0l5-5m-5 5h12"
        />
      </svg>
      Back
    </nuxt-link>
    <ContentDoc v-slot="{ doc }">
      <h2 class="my-4 text-4xl font-semibold">{{ doc.title }}</h2>
      <p class="my-4 text-gray-500">
        by, {{ doc.author }}, {{ convertDate(doc.date) }}
      </p>
      <div
        class="prose prose-lg first-letter:text-3xl first-letter:text-blue-600"
      >
        <ContentRenderer :value="doc" />
      </div>
    </ContentDoc>
  </main>
</template>
Again, we'll notice a few subtle differences
- The
on:clickdirective in Svelte is replaced by@clickin Vue - Rendering the variables uses double-curly braces instead of single, like we've seen before
- We can get access to all of the individual document's attributes by wrapping the content in the built-in
<ContentDoc>component, the documentation for which you can see here.
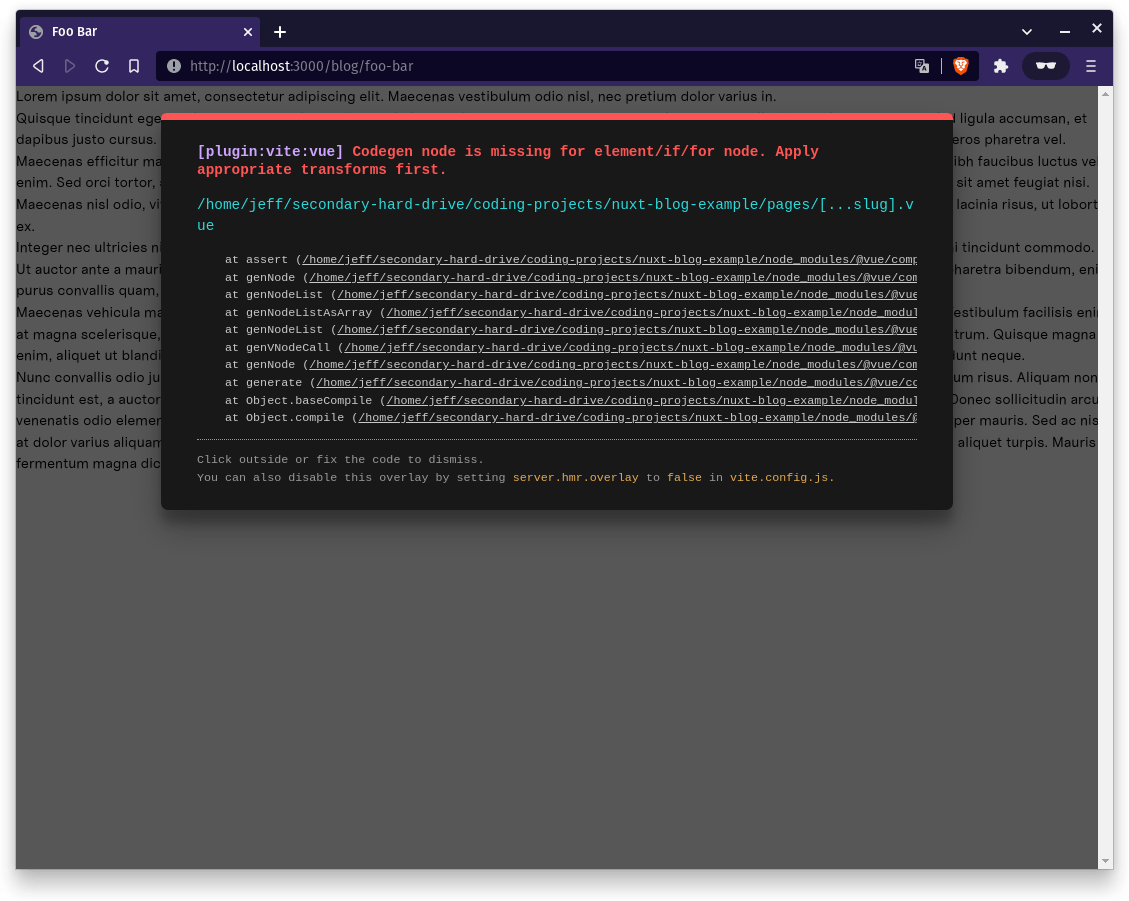
One thing I'll note, I still haven't been able to get the multiple slot functionality (i.e. the #not-found and #empty stuff) working.
Any time I try including it I get the following error:
 In order to get this all to work, though, we'll need to add in one more bit of functionality, namely the
 convertDate method that is referenced in the template.
Since this is not the only place we'll be using it, I'll create a utils folder at the root of the project and just create an index.ts file here to include this functionality.
// /utils/index.ts

export const convertDate = (published: string): string => {
    const months = {
        1: "Jan",
        2: "Feb",
        3: "Mar",
        4: "Apr",
        5: "May",
        6: "Jun",
        7: "Jul",
        8: "Aug",
        9: "Sep",
        10: "Oct",
        11: "Nov",
        12: "Dec",
    };
    const date = published.substring(0, 10);
    const [year, month, day] = date.split("-");
    return `${day}-${months[parseInt(month)]}-${year}`;
};
and we'll just import this method both into /pages/[...slug].vue as well as /pages/blog/index.vue as we'll use it there to convert the date format to a more readable one for the list view, as well.
Since, as of this point, both of those components are stateless (they don't have a script tag yet) we can just add the following snippets to the top of each of the components as displayed below
/pages/[...slug].vue
<script setup>
  import { convertDate } from '../utils'
</script>
/pages/blog/index.vue
<script setup>
  import { convertDate } from '../../utils'
</script>
After adding this to index.vue we'll also want to replace the <time datetime="2020-03-16">{{ article.date }}</time> with <time datetime="2020-03-16">{{ convertDate(article.date) }}</time>
Extras
At this point we're essentially done with the original "stuff" from the last post. The only things we need to add to match functionality are
- Sorting descending by date
- The ability to search by author
- A custom NewWindowUrl component
Sorting
We can see in (content.nuxtjs.org/api/components/content-l..) that we can in theory pass in a queryContent attribute as a :query prop to query our blog posts.
Unfortunately, when I add
const qc = await queryContent("blog").sort({author: 1}).find()
and remove the path="/blog" from the <ContentList declaration while adding :query="query" then nothing will change.
I don't know if maybe I'm doing something incorrectly or if something is broken, but this doesn't work for me.
So, it is at this point where I'll remove the <ContentList component, and instead just use a generic array of posts.
To understand what I mean, take a look at the updated component:
<script setup>
import { convertDate } from "../../utils";

const qc = await queryContent("blog").sort({ author: 0 }).find();
</script>

<template>
  <main class="bg-white px-4 pt-16 pb-20 sm:px-6 lg:px-8 lg:pt-24 lg:pb-28">
    <div class="mx-auto max-w-lg lg:max-w-7xl">
      <div class="border-b border-b-gray-200 pb-6">
        <h2
          class="text-3xl font-semibold tracking-tight text-gray-900 sm:text-4xl"
        >
          Recent Posts
        </h2>
      </div>
      <div class="mt-12 grid gap-16 lg:grid-cols-3 lg:gap-x-5 lg:gap-y-12">
        <div
          v-for="article in qc"
          :key="article._path"
          class="flex flex-col justify-between rounded-lg border border-gray-200 p-4"
        >
          <nuxt-link :href="article._path">
            <p class="text-xl text-gray-900">{{ article.title }}</p>
            <p class="mt-3 text-gray-500">{{ article.description }}</p>
          </nuxt-link>
          <div class="mt-6">
            <a
              :href="`?author=${article.author}`"
              class="text-sm font-medium text-gray-900"
            >
              {{ article.author }}
            </a>
            <div class="text-sm text-gray-500">
              <time datetime="2020-03-16">{{ convertDate(article.date) }}</time>
            </div>
          </div>
        </div>
      </div>
    </div>
  </main>
</template>
This will sort the posts in ascending order by author, so foo-baz.md will appear first in the list.
If we replace {author: 0} with {date: -1}, though, the sorting will work with the dates sorting in descending order.
This works because of the way we've written the date field in each blog post.
What if we don't want to have to use convertDate, though, and instead we just want the date to be the human-readable format?
In that case we would not be able to sort on that because it wouldn't sort the string correctly.
What we can do instead is add a numeric value to the beginning of each blog post title.
For example, foo-bar.md becomes 1.foo-bar.md, hello-world.md becomes 2.hello-world.md, and foo-baz.md becomes 3.foo-baz.md (this numbering was chosen because of the chronological order).
Nothing will change on the display order of the posts, but we can now add the following sorting parameter to the query:
const qc = await queryContent("blog").sort({ _file: -1, $numeric: true }).find();
and this will order the posts in the opposite order of the file names, which are increasing with the number at the beginning. Then, for any new post we create, which we will do in a few minutes with testing out the custom component functionality, we simply increase the number to the next one.
Fetching only posts by a specific author
As you can see, we already have a link associated with the author field in the list view.
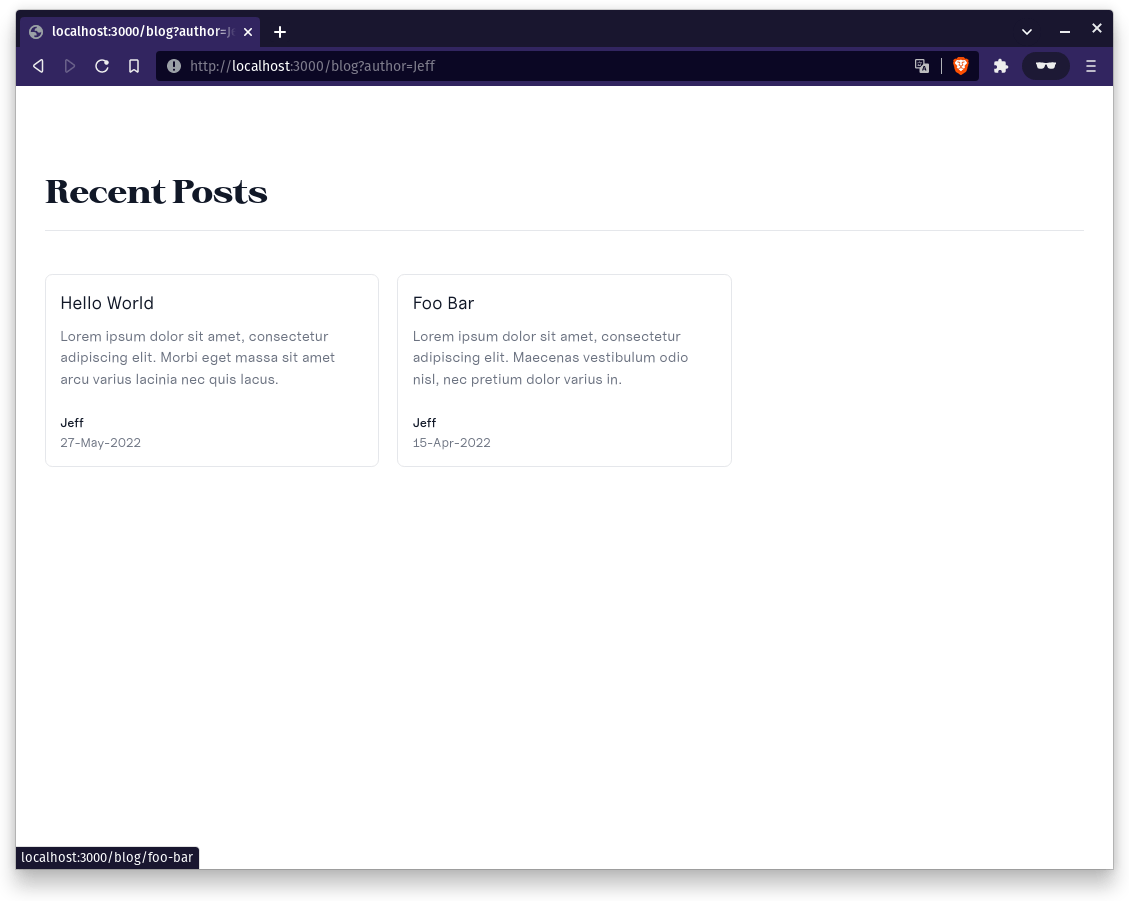
If you go to localhost:3000/?author=Jeff you will still get the entire list of posts.
We simply need to add a filter to the queryContent that I set up in the previous section to handle filtering by author.
First, we need to use the useRoute composable to get the "author" field from the query, if it exists.
Then we just add a .where() clause to the query, and this should handle everything for us.
<script setup>
import { convertDate } from '../../utils'

const { query } = useRoute();
const { author } = query;

const qc = await queryContent("blog").where({author}).sort()
</script>
Now, if we go to localhost:3000/?author=Jeff we'll see
Custom component
In order to handle this we'll first create a /components/content directory at the root of the project.
We don't need to create a new window URL component like I did in the last post because links external to your Nuxt Content blog will open in a new window regardless.
Instead, we'll create hero and card components (these are pulled directly from the documentation).
We'll create /components/content/Hero.vue and /components/content/Card.vue and set them up to look like
/components/content/Hero.vue
<template>
  <section>
    <h1 class="text-4xl"><slot /></h1>
    <slot name="description" />
  </section>
</template>
/components/content/Card.vue
<template>
  <div class="p-6 border bg-white dark:bg-black dark:border-gray-700 rounded">
    <slot />
  </div>
</template>
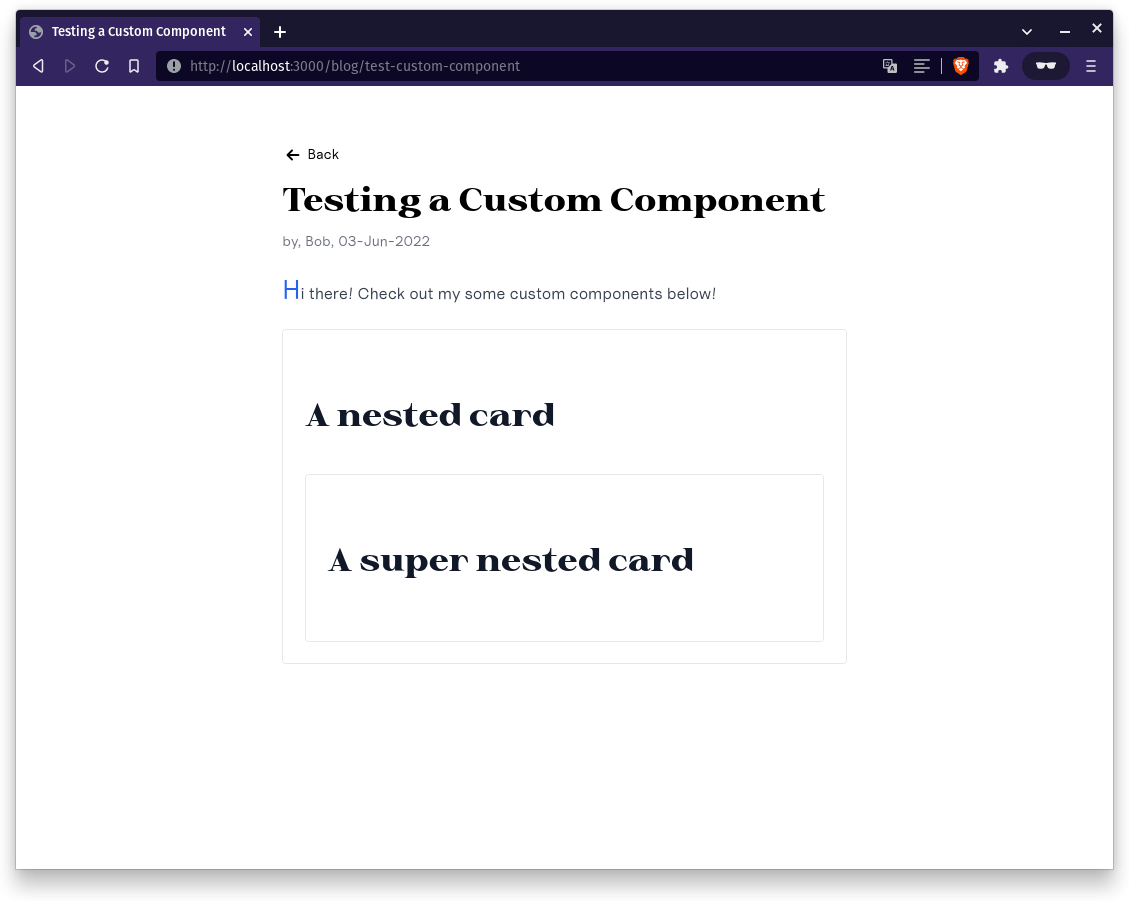
We can then use them in the newly created blog post, /content/blog/4.test-custom-component.md
---
title: Testing a Custom Component
author: Bob
date: 2022-06-03
---

Hi there! Check out my some custom components below!

::hero
:::card
A nested card
::card
A super nested card
::
:::
::
and we are left with
Conclusion
And there you have it, a very similar blog setup to what was done in the last post, but this time using Nuxt instead of SvelteKit and using Content v2 instead of MDsveX. Ultimately I think the route you go depends on the tech with which you're more familiar, but I will say that I am a huge fan of what they've done with Nuxt v3 and Content v2, which makes sense considering I spent the first 4 years of my professional life as a Vue developer. There will definitely be more content around Nuxt down the road but this is all for now.